


Fun craft alert that can go from one holiday to the next!
Make your own pumpkins and either give them funny faces for Halloween, fill them with goodies or just have them as decoration at your Thanksgiving table! You could use them as place settings, decorations around your house, or a fun way to give out treats to friends and family.
The possibilities are endless!
[hr]
Items you will need: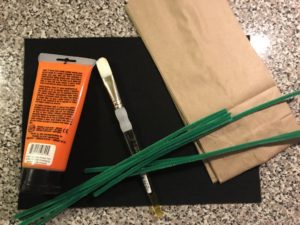
- -2 paper bags (only 1 if using with another filler item like candy or holiday goodies)
- -1 green pipe cleaner
- -Orange Acrylic paint
- -Larger Paint Brush
- -Paint tray or plate
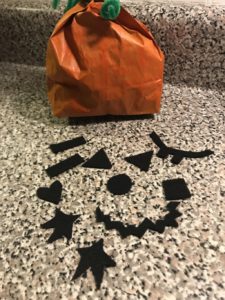
- -Black Felt (for Halloween face)
- -Glue or tape
[hr]
Steps:
- First, take the paper bag and open it with your hand inside
- While your hand is inside the bag– paint the outside of the bag orange, painting from the bottom of the bag up about 5 inches. The more you paint the smaller the stem will be and the more filling you will need.
- Let the bag dry standing, should not take more than an hour. (Do not heavily paint so that it does not wilt the bag.
- As that is drying cut out funny face pieces in the felt if using this for Halloween. Otherwise get your filling ready. If just filling with another paper bag, open the bag and scrunch it lightly so that it will fill up a good portion of the cavity. If using for Thanksgiving or as a treat bag filled with your choice of filling (ie. Popcorn, candy, small plastic toys, paper strips with thankful wishes…etc.)
- After the bag is dried stuff the bag with your filling choice.
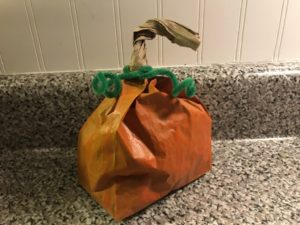
- Then take the top unpainted portion and twist it tightly counter-clockwise (it’ll still turn out fine twisted the other way but it seems to curve better when done counter-clockwise).
- Bend the stem until it is curved in an arch or how you find it best.
- Take a green pipe cleaner and decorate the base of the stem. Twist it so it’ll stay and then use your finger to make the curls by wrapping the ends around.
- If using for Halloween and want to make it a jack-o-lantern, take the funny shapes you cut out of the black felt and either use tape or glue to attach. You could also use felt and goofy plastic eyes to make it even goofier or go to your local craft section and find the funny face stickers. I just cut out simple shapes and jagged teeth to be put on the pumpkin.

[hr]
TIPS:
- The shapes for the Halloween pumpkin can be used as a good shape recognition-teaching tool.
- If you do not like the stem long you can cut it short after twisting.
- Do not paint heavily or else the bag will not stand up to being stuffed
- To make more delicate you could use fake leaves and green yarn for the accents.
- You can even make bigger ones with paper grocery bags but that takes a lot more filling!


